How to Plan a Trip in Google Sheets (+ Free Travel Itinerary Template)
A step-by-step guide to planning a trip in Google Sheets: set up a clean trip planner spreadsheet with itinerary, budget, and packing tabs, grab a free travel itinerary template you can copy, and know when your spreadsheet has run out of room.
Plenty of organized travelers plan a whole trip in Google Sheets, and it makes sense. It's free, it opens in a browser, and a spreadsheet gives you rows and columns to line up every day, time, and place without anything getting lost. If you already keep your life in sheets, planning a trip there feels natural. Here's the fork. If you just want a rough list of things you might do, a single tab with a few rows is plenty. But once you're planning several days across a lot of places, and you want times, a budget, and a packing list all in one file, a loose list gets messy fast. That's what this guide is about: building a trip planner spreadsheet that actually holds together, plus a free travel itinerary template you can copy at the end. Below, I'll walk through how I set up a travel planning spreadsheet in Google Sheets on desktop, tab by tab. Then I'll hand you the template, show you how to take it on your phone, and go over where a spreadsheet starts to fall short so you know what you're getting into.
Set up your trip sheet
Open sheets.google.com and start a blank spreadsheet. Name it at the top-left so you can find it later, something like "New York, March 2026." A trip holds a few different kinds of information, and they don't belong on the same tab. At the bottom of the screen you'll see one sheet tab. Right-click it and rename it "Itinerary," then use the little plus in the bottom-left corner to add two more: "Budget" and "Packing & To-Do." Three tabs, one file.

On the Itinerary tab, build your header row across the top: Day, Date, Time, Activity, Category, Location, Cost, Notes, Map Link. That order matters, because you read a day left to right the same way you live it. Two small things make that header behave. Select the first row, go to View, then Freeze, then "1 row," so the headers stay put when you scroll down a long trip. Then click the letter above the Category column, open Insert, choose "Dropdown," and load it with your six options: Food, Sightseeing, Hotel, Transport, Flight, and Activity. Now that column fills in with a tap instead of retyping the same words all day.
Build your day-by-day itinerary
Now fill it in, one row per stop. Put the day number in the Day column, the date beside it, and a rough time in Time so the day has a spine. Activity is whatever you're doing at that hour, and it isn't only place names. "Katz's Delicatessen" belongs there, but so does "Check in at hotel" or "Dinner reservation, 7pm." Write it the way you'd say it to a friend. Location holds the neighborhood, not the full street address, so Lower East Side or Upper West Side rather than a house number, because the neighborhood is what tells you whether two stops sit near each other. Cost is what that line runs you, and 0 if it's free. Drop the link in Map Link (in Google Maps, hit share, copy link, paste it in). Notes is where the small stuff lives: the reservation name, the thing you don't want to forget, which entrance to use. Group your rows by day, all of Day 1 together, then Day 2, and so on. A wall of white rows is hard to scan, so give each day its own color. Select that day's rows, click the fill-color bucket in the toolbar, and pick a light shade. Do the next day in a different color. Now the days separate at a glance instead of blurring together.
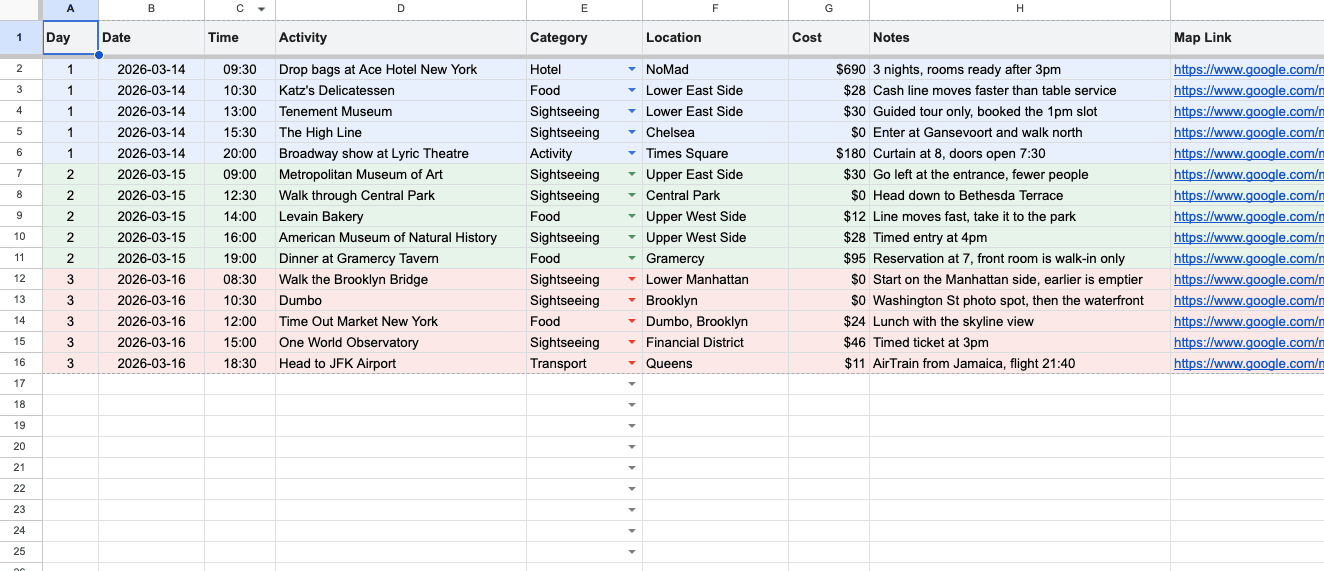
One tip. Keep the times in order within each day, and if they drift, select just that day's rows, open Data, and choose "Sort range" by the Time column. Sheets reorders them for you. Do this one day at a time, not across the whole sheet, or you'll scramble the trip.
Track your budget in a second tab
Switch to the Budget tab and build a header row: Category, Item, Estimated, Actual, Difference. Category groups the spend (Flights, Accommodation, Food & Dining, Transportation, Activities), Item is the specific thing, Estimated is your guess before you go, and Actual is what you really paid once the trip starts. Difference is the column that does the thinking for you. Click the first cell under it, type =, click the Actual cell in that row, type a minus sign, click the Estimated cell, and hit enter. Copy it down the column. A positive number means that line went over budget and a negative one means you came in under, so you can spot the trouble at a glance instead of doing the math in your head. Under your last row, add a row labeled TOTAL. In the Estimated column type =SUM(, select every number above it, close the bracket, and do the same in Actual and Difference. Now your estimate, your real spend, and the gap between them add themselves up as you go.
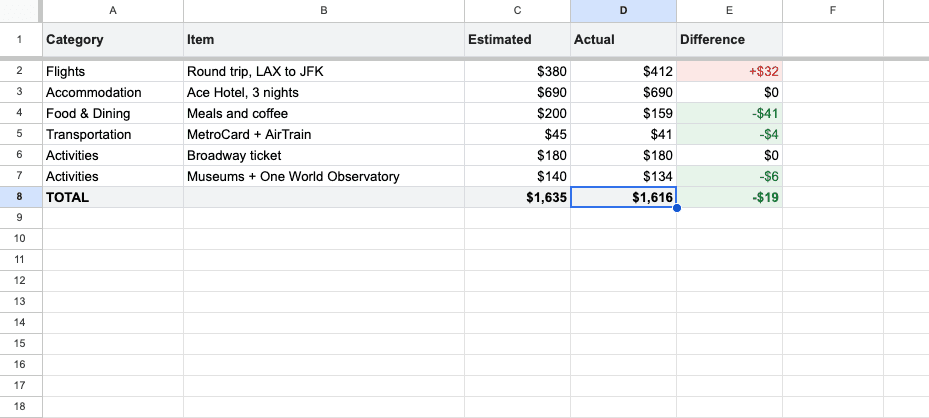
Select the Estimated, Actual, and Difference columns and set them to currency so the numbers read as money: Format, then Number, then Currency, and pick the one you're spending in. If your trip crosses currencies, keep the tab in one and convert as you type, or the totals stop meaning anything.
Add a packing and to-do tab
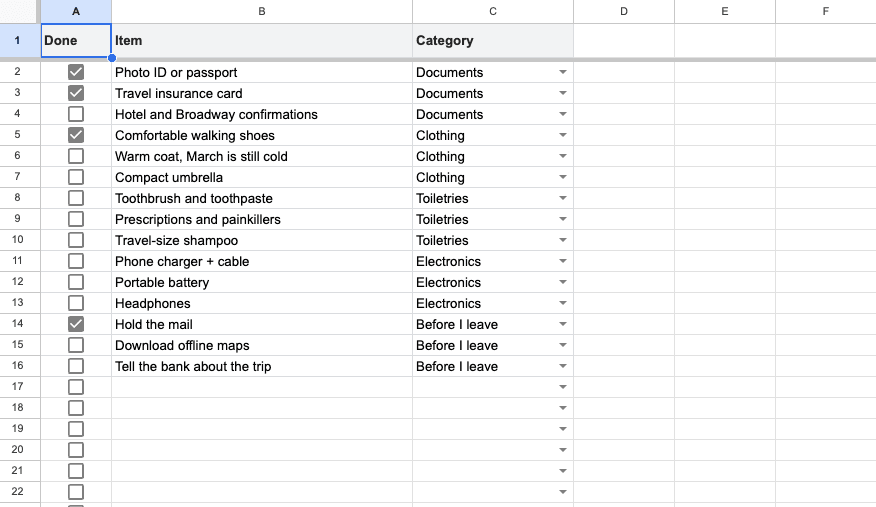
The last tab is the one that saves you at the front door. On the Packing & To-Do tab, keep it simple with three columns: a checkbox, Item, and Category (Clothing, Toiletries, Electronics, Documents, Before I leave). Click the first cell under your checkbox header, open Insert, and choose "Checkbox." Copy that cell down the column so every row has one. Now list everything you need to pack and every errand before the trip, passport, chargers, hold the mail, and tick them off as you go.
Grab the free template
Building all of that from a blank sheet takes a while, so I made a copy you can start from. It has the three tabs already set up, the headers in place, the Category dropdown loaded, the budget totals wired up, the Difference column already turning red when a line goes over and green when it comes in under, and the checkboxes ready to tick. Open the template here: Open the free template. Go to File, then "Make a copy," and it drops a fresh version into your own Google Drive that's yours to edit. Change the trip name, clear my sample rows, and start filling in your own days. Nothing you type touches the original, so you can always pull another clean copy for the next trip.
Take it on the road
A spreadsheet you built on your laptop rides along on your phone. Install the Google Sheets app, sign in, and your trip file is already there. To make sure it works when the wifi doesn't, open the app, tap the three dots next to your file, and turn on "Available offline." Now the plan loads on a mountain road or a subway platform with no signal. Here's the honest part. A spreadsheet that felt roomy on a big screen gets tight on a phone. Nine columns is a lot to fit in one hand. You're pinching to zoom, scrolling sideways to reach the Notes column, and hunting for the right row while you stand on a corner trying to figure out where to go next. It works, but it's fiddly at the exact moment you want it to be fast.
Where a spreadsheet starts to run out of room
Google Sheets is a great place to plan. But the more you lean on it, the more you feel the edges. There's no map in it. A sheet can tell you you're hitting three places on Day 2, but it can't show you they're scattered across town in a way that makes the order painful. You end up flipping between the sheet and Google Maps to work out what's actually near what, and the plan and the map never live in the same place. Reordering days is a chore. Move Day 3 ahead of Day 2 and you're cutting and pasting whole blocks of rows, fixing the day numbers by hand, and re-coloring everything so it still reads. One change to the plan turns into ten minutes of spreadsheet surgery. And it gets rough on your phone mid-trip, the moment you need it most. The thing you built to keep yourself calm turns into pinching and scrolling while you're trying to catch a train. None of this means the sheet was a bad idea. For laying a trip out and thinking it through, it's genuinely good. It's the map, the reshuffling, and the on-the-road moments where it runs thin.
When you need more, bring it into trablog
Once your places are lined up in a sheet, the natural next step is to see them on a map. That's where the order of a day stops being a guess. In trablog you put your stops on a map and the distances show up, so the sightseeing spot that looked fine on row 7 turns out to be clear across the city, and you fix the order before the trip instead of during it. It's the same day-by-day plan you built in the sheet, with times, notes, transport, budget, and a checklist, but it reads at a glance and reshuffling a day is drag-and-drop instead of cut-and-paste. It hands you Google Maps links between stops so you can see the route fast, and the plan you build on your laptop pulls up cleanly on your phone. trablog is free, with a guest mode that lets you start without an account.
More city guides
See all guides
Days in Tokyo: A First-Timer's Day-by-Day Itinerary
How to Plan a Trip on Google Maps: Multi-Stop Routes & Day-by-Day Itinerary

Utah Mighty 5 National Parks Road Trip: The Perfect 7-Day Itinerary (Zion to Canyonlands)

Pacific Coast Highway 5-Day Road Trip Itinerary (San Francisco to Los Angeles)

San Diego 5-Day Itinerary for First-Timers: A Day-by-Day Plan You Can Actually Follow